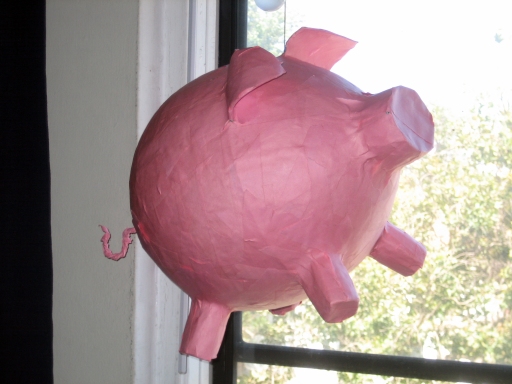
In honor of my niece having turned the big 1-0, I threw her a mini-luau at the beach. Since we couldn’t exactly bury a pig in the sand, we decided to make a papier-mâché pig piñata. Traditionally, piñatas are stuffed with treats and then kids club them to death until their guts fall out. Way to reward violence! :) That was the original plan but then this little piggy got anthropomorphized and the kid got attached. Winston is his name. He was ultimately modified so that his pudgy little body could be spared.
The making of Winston was pretty simple with a few supplies we had around the house. We were inspired by this Pin and we’re sharing the process as part of the Pinterest Challenge. Woo hoo!
Glue (we made three total batches of glue – one for each layer):
- 3 tbsp all-purpose flour
- 1/2 tsp corn starch
- 1 tbsp granulated sugar
- 1/4 cup cold water
- 1 cup boiling water
To make the glue, bring 1 cup of water to a boil. Then mix all the dry ingredients together. Add the cold water to the dry ingredients to make a runny paste. Whisk the runny paste into the boiling water and stir constantly until you get the first bubbles of boiling. Immediately remove from the heat and set aside to cool – about 15 minutes.
Assembly:
- balloon
- masking tape
- 7 bathroom tissue tubes (4 for legs, 1 for snout and 2 for ears)
- newspaper, torn into 1.5″ strips
- pink construction paper, torn into strips
- butcher’s twine
- paint brush
- black marker
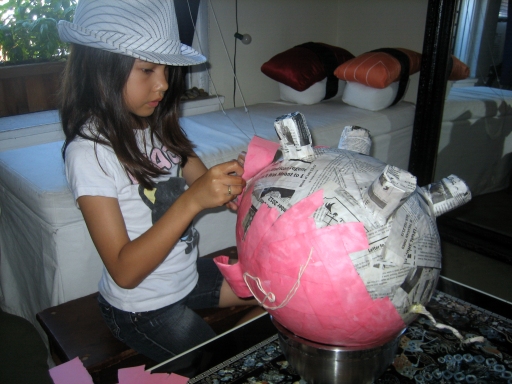
For the legs, I cut off about 1.5″ off of each tube so Winston’s legs weren’t too long. I cut open another tube and cut that in half to create a larger, shorter tube for the snout. The tail was strips of paper* twisted together then wrapped around a pencil for the coil. All of Winston’s extremities were then attached with masking tape.
*In the process of covering Winston, we realized that his newspaper tail would be impossible to cover in pink so we had to perform emergency surgery and his tail was replaced with a pink construction paper one.
I started with reinforcing the legs by brushing glue on Winston’s legs and belly. The strips were then applied all the way around each leg so that it was touching both the leg and the body (kind of like a starburst effect) so that it’d be secure when it was all dry. The same was done to his ears and nose. Section by section, the then-soon-to-be-10-year-old and her sister painted Winston in glue and applied the strips until his entire body was covered.
We found that the brush then strip method kept things really neat and tidy without having to submerge each strip in glue then trying to messily apply it to his body.
We covered Winston with three layers – allowing for a complete dry and hardening between layers (time will depend on your atmospheric conditions) – two newspaper and one pink construction paper.
Butcher’s twine (for hanging Winston) was tied around his entire body and behind his ears after the first layer was dry so that it was extra secure.
The initial pudgy body modification idea was to make a less-violent string piñata. A string piñata usually involves a trap door from which several strings are tied but only one of which actually opens the door. I thought I could make udders from which the strings would be attached. Then I remembered Winston was a boy. :/
I also didn’t like the idea of one kid getting all the guts and glory.
Husfriend came up with the brilliant idea that Winston could crap candy leis! It was a perfect solution (that I had to execute by myself). :/
The candy leis were simple yet very time-consuming to make:
- candy (I used three packages of individually-wrapped hard candy which yielded about 20 yards of lei)
- 1 roll of cellophane
- curling ribbon, cut into 6″ pieces
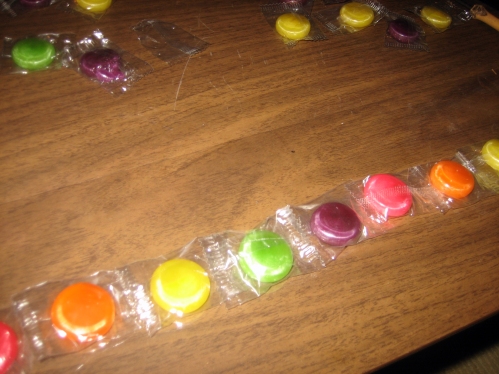
The cellophane was cut into 3″ wide strips spanning the length of the roll. The candy was then laid in a long row in the middle of each long strip of cellophane. The OCD in me also had to have the candy Roy G Bivved. The cellophane was then wrapped around the row of candy and ribbon was tied at each joint. When I got to the end of each strip, more cellophane was added and overlapped to keep it continuous. Then after every single joint was tied, I went back and curled all the ribbon.
I was too deliriously tired to take any decent pictures. This was the only salvageable one:
The single super long strand of candy was then painlessly stuffed into Winston via a newly-minted butt hole. :)
In the end, it was all worth it. Projects like this always remind me of my father. He was my Martha before I knew of the Martha.
Winston was a major hit and the kid was happy. Her friends got a major kick out of pulling candy crap out Winston’s butt and wearing it around their necks.
Winston had fun.
But his butt was tired!


The photo you used for the link party: pure genius. Made me laugh; great job too!
Thanks, Sarah! I’m an easily-amused fan of the toilet humor like that. :)
super cute!! I would LOVE for you to link this up at my Ginger Jamboree Link Party!!
Thanks, Megan! I would love to attend the Ginger Jamboree. :)
Oh my god, this is amazing. Pig butt candy.
Hehe, thanks Elisa. :)
So cute! My son broke his pig piggy bank. Maybe I’ll try to make him one out of papier-mâché!
Thanks, Michelle. :) That’s a good idea. Winston would have made a great piggy bank.
Haha I just love that the candy comes out of his butt! My girls would find that hilarious!!
Hehe! It’s definitely for the mature-minded like me. :)
Thank you for this! I googled Pig Piñata and yours came up. I am going to attempt an “evil Dr. Porkchop” for my daughter’s Toy Story birthday party and this is perfect! Just one question, what size of balloon did you use, and how did you make it so it was so perfectly round?
Great job!
Thanks, Sofi! Evil Dr. Porkchop would be so cute! I used a 12″ Qualatex balloon. Their round balloons actually blow up round without that weird bulge. :) I’d love to see how yours turns out. Good luck!