Babes, What’s for Dinner: Tacos Al Pastor

Being in Hollywood has so many great perks – one of which is easy access to amazing, and often very affordable, food.  One can stumble outside and have their pick of a bounty of food and cultures.  Within walking distance of the apartment, we have access to Peruvian, Pescatarian, Thai, Indian, Vietnamese, Japanese, Hungarian, Greek, Southern Italian, Northern Italian and Mexican.

Nothing beats Tacos al Pastor any time of day.  These delicious parcels of goodness originated in Puebla, Puebla as the result of the natives adapting the shawarma that was introduced to them by Lebanese immigrants.  Mexicans swapped out lamb for pork and added their own herbs and spices.  To say that we’re big fans of both versions would be a big understatement.

If we could, this would have a permanent home in our home:

Source

Alas, we barely have room for Dorothy.

There are many recipes on the internets and this is a culmination of a few tasty trials:

  • 1 4-lb  pork butt roast
Marinade:
  • 5 dried guajillo chili peppers
  • 5 dried ancho chili peppers
  • 5 dried anaheim chili peppers
  • ½ tsp whole cumin
  • 5 whole cloves
  • 1 small cinnamon stick
  • 1 tbs annatto seeds
  • ½ tbs dried mexican oregano
  • 5 large garlic cloves
  • ½ cup rice wine vinegar (the regular stuff can be used – I just don’t like the smell of it)
  • 1 chipotle chili pepper (in adobo sauce)
  • 1 tbs adobo sauce (from the can of chipotle chili peppers)
  • 1 fresh pineapple cut into 1/2″ slices (3 slices for the marinade and the rest for the cooking with the meat)
  • 1 cup water
  • 3 tbs canola oil
  • ½ medium onion, chopped
  • 4± tsp kosher salt
Mandatory Garnish:
  • ½ medium onion, finely chopped
  • ½ bunch cilantro, chopped
Optional Guacamole Garnish (just mash it all together):
  • 2 large avocados
  • 2 tbs white onion, chopped
  • 2 tbs cilantro, chopped
  • 2 tbs tomato, chopped
  • kosher salt, pepper and lime juice to taste

Before starting the marinade, put the pork in the freezer to make it easier to slice (about half an hour).  Oftentimes, I just have the butcher do it for me.

Dissect the peppers by removing their stems and seeds.  Then cut them into pieces with kitchen shears and gently toast in a frying pan over medium heat.   Flip often as to not burn them which will impart an unwelcome bitterness to the marinade.  Then toast the cumin, cloves, annatto seeds and cinnamon stick.  Let cool then finely grind the peppers and spices in a blender.

Except for the salt, oil and onion, blend in the remaining ingredients until a watery paste forms.

Brown the onions with the oil then add to the blender and pulverize.

Cut the pork into lengthwise slices about 1/3″ thick and spread out onto a large baking dish and salt accordingly.

Then slather the marinade between each layer until every nook and cranny is covered.  Cover and allow it to marinate in the fridge overnight.  When I don’t plan ahead and am super craving tacos on the day of, we just use our vacuum sealer to marinate the meat.  It takes about 12 minutes to get the same results as a tortuous overnight wait.

When it’s time to cook, spread the meat out in one layer in a shallow, lightly oiled baking dish or on a rimmed cookie sheet and place in the set-to-high broiler.  There should be some open space between the pieces; it’s better to do multiple batches than to crowd the meat.  When I made the marinade, I warned Husfriend to not eat the pineapple slices in the fridge as they were going to be used for the tacos al pastor.  Turns out I forgot to remind myself so when it came time to cook the meat, we didn’t have the pineapple.  Normally, the pineapple slices go on top of the meat in the oven.

Assuming you didn’t accidentally eat the pineapple too, broil the meat and pineapple for 10-15 minutes until well browned and crisp; there should be some caramelized juices in the bottom of the dish.  For the “taco-shop” treatment, dice the meat and toss in a pan over medium-high heat with the pan drippings.  This’ll give the edges a little crisp and infuse even more flavor.

¡Buen provecho!

Babes, What’s for Dessert: Gluten Free Cheesecake with Salted Caramel Sauce in Mason Jars

There are few things in the world that I enjoy more than the Golden Girls.  The Husfriend can attest to (and is befuddled) as to how I can never tire of watching my favorite foursome.  They were having senior sex in the city long before there was Sex in the City.

As an homage to my favorite ladies, we’re making cheesecake.  Our first foray into cheesecake-making turned out pretty good.  We used a gluten free almond tart crust that was decent.

However, the crust wasn’t crusty or graham crackery enough so we gave it another go.

All of the ingredient quantities will yield 20 half pint cheesecake jars.

This recipe was tweaked for a gluten free graham cracker crust.

  • 1 2/3 cups gluten free bread crumbs
  • 1/3 cup packed brown sugar
  • 1 1/3 teaspoons freshly ground cinnamon (it makes a diff)
  • ¾ teaspoon baking powder
  • 1/3 teaspoon xanthan gum
  • 1/3 teaspoon baking soda
  • 1/3 teaspoon salt
  • 5 ¼ tablespoons butter, cut into pieces
  • 2 ¼ tablespoons cold water
  • 2 ¼ tablespoons honey
  • ¾ teaspoon vanilla

Preheat the oven to 325°.

Whisk together the cold water, honey and vanilla.  Set aside.

Combine all the dry ingredients in a mixer.

Then mix in the butter until it’s fully incorporated.

Then add the honey mixture until all is doughy.  If the dough is too dry, add a little more cold water, a teaspoon at a time.

Next, press the dough onto the bottom of each jar for the crust.  To get the same amount of crust into each jar, I used my 1/4 cup measuring cup as a mold then cut each piece in half.

Bake for about 12 to 15 minutes, until golden brown. Let cool.

I begrudgingly omitted the mascarpone from this recipe for the filling as I already had a gigantic 3-lb brick of cream cheese to use up:

  • 3 lbs cream cheese, room temperature
  • 2 cups sugar
  • 3 teaspoons fresh lemon juice
  • 1 ½ teaspoons vanilla extract
  • 6 large eggs, room temperature

In a large stand mixer, cream everything together except for the eggs which are to be added one by one at the end until all is combined.

Then pour the filling into each cooled jar, leaving some room for sauce.  I did just under ½ cup of filling for each jar.

Place all of the jars on a large heavy duty baking sheet. Place baking sheet in oven then fill the baking sheet to the brim with water. Bake for half an hour.

Transfer the jars to a baking rack.

Time for the salted caramel sauce…

I’ve used this recipe twice now and it has yielded gorgeous lusciousness each time.

  • 1 ½ cups of granulated white sugar
  • ½ cup of water
  • 1 cup of whipping cream
  • 1 ½ tablespoons of salted butter
  • 1 teaspoon of vanilla extract
  • ½ teaspoon sea salt

Combine the sugar and water in a medium saucepan over medium-high heat. Swish and swirl often until it reaches a medium amber color.

Remove from heat, and pour in the cream. Be forewarned – it will scarily bubble.

Give it a whisk, then add in everything else.

Whisk again ’til smooth.  Let cool.

Top each cheesecake jar with the caramel sauce and let cool completely before closing with the lid and band.

Refrigerate until time to devour.  It was even tastier the next day.

This is the lone ranger that remained.  We gave the rest away to our friends.

Babes, What’s for Dinner: Rosemary Chicken with Pancetta

Our new favorite show is “Two Greedy Italians” from BBC Two.  It’s a fun show that follows two old chefs, Antonio Carluccio and Gennaro Contaldo, around as they explore their roots in Italy.

They make the most amazing-looking food on the show.  Unfortunately, the recipes aren’t posted anywhere so the following is our attempt at recreating the featured deliciousness that Gennaro made with wild pheasant.

Considering that there aren’t too many wild pheasants roaming around Hollywood, we had to make do with some organic chicken drumsticks that were on sale at Sprouts.  Even with the organic chicken, the entire meal ended up being about $3 per serving and this configuration can serve two gluttonous individuals or three normal people:

  • 4± tablespoons of extra virgin olive oil
  • ¼ cup of all-purpose flour
  • kosher salt and freshly cracked pepper to taste
  • 1 ½ lbs of bone-in chicken (in this instance, breast may not be best)
  • 3 sprigs of fresh rosemary (ours were from our window box)
  • 12 slices of thinly sliced pancetta (about two slices per piece of chicken)
  • 6 cloves of garlic, smashed with skin on
  • 1 dry chili pepper, broken up
  • 1 cup of Chardonnay (or any good-enough-for-drinking white wine will do)

First, fire up a skillet on medium high heat with enough olive oil to coat the bottom.  Any heavy skillet with a lid or braiser will do.  We used our rarely-used cast iron tagine and it worked perfectly.

Season the chicken with the salt and pepper and lightly coat with flour.  Shake off the excess and brown the chicken in the by-now-should-be-hot-enough skillet.

Once the chicken is browned on both sides, lower the heat to medium-low, and add the chili pepper, garlic, pancetta and rosemary sprigs.

Cover and let cook for 5 minutes.

Then, add the white wine, cover and let cook for 30 minutes.

In the meantime, prepare its perfect accompaniment, polenta.

  • 3 cups of water
  • 1 teaspoon of salt
  • 1 cup of coarsely ground yellow cornmeal
  • 1 ½ tablespoons of unsalted butter

Bring the water and salt to a boil in a heavy saucepan. Gradually whisk in the cornmeal. Reduce the heat to low and cook until the mixture thickens and the cornmeal is tender, stirring often, about 15 minutes. Turn off the heat. Add the butter, and stir until melted.

Serve the chicken (and garlic) atop a healthy dollop of the polenta and be sure to drizzle with the braising liquid.

Buon appetito!

Ch-Ch-Ch-Changes

Yesterday, Pepsi exchanged our change for some handy household items.

We opted for $59.50 in Amazon credit instead of paying the nearly 10% fee.  These Coin Stars are very smart.  It’s either take 10% of my money up front or entice me to eventually spend 100% of it.  Not bad.

With our shiny new Amazon credit, we got some cedar balls, a set of washer hoses, a hose mender to attach said hoses to an adapter that’ll convert our full-size washer/dryer to a portable unit that’ll attach to the kitchen sink, some cloth strainer bags to make homemade almond milk and a wireless switch outlet.  I would say that’s a pretty good haul for “free” money.

I’m very much looking forward to receiving our new stuff.  It’ll mean some minor and major fixes to the abode to make life a little bit easier.

I’m excited to make some homemade almond milk.  Husfriend wants to try walnut milk too.  Looks pretty easy and I’m sure it’ll be tasty so we’ll see…

The wireless switch outlet is basically a remote control for anything that you plug into it.

I like that it looks like a traditional switch that’s missing its wall.  :)

I had one for the living room lamp but it finally crapped out.  I tried replacing the battery, which was dated 2007, but it still didn’t work.  I’ve had it for over 10 years.  I’d say that’s a pretty good run for a <$20 device.

Speaking of changes, Walter the Washer had his name changed to Stan.  My friend Sara suggested it and I think it’s very fitting considering he’s moved in with Dorothy.  Hehe.  :)

When the hoses and the mender arrive, we’ll finally be able to use our washer/dryer.  We’ve been through so many incarnations as to how to connect it to a water source.  My sister‘s man, Nathan, is a general contractor and he explored some water line options for us.  The original idea was to have the washer/dryer in the dressing room opposite the bathroom where it’d share a permanent water connection with the bathroom sink.  However, it turns out that the plumping is so old that he wouldn’t have been able to connect a new water line to the current plumping without it basically crumbling to pieces.

So, the washer/dryer has now been moved into the front hallway closet.  It was a surprisingly painless move considering the doorway is 27″ wide and the washer/dryer is 27″ wide.  I removed the entire door, set it aside and summoned the Husfriend to help slide the washer/dryer into place.  The magical furniture sliders from Home Depot really helped with sliding that puppy across the carpet with ease.

At one point in time, before our time, our kitchen had a window between the refrigerator and counter.  Apparently, seismic retrofitting meant having to sacrifice the window.  To allow more light into the kitchen, they cut a hole in the opposite wall for what we now call the service window.

When you walk in the front door, the “laundry room” closet is to your right and the service window into the kitchen is to your left.  This will be the conduit for which water will travel to and fro the kitchen sink.

Note the old fashioned icebox that we believe used to drain directly into the sink.  I think it’s pretty nifty.  We now use it to house our pots and pans.

Although our kitchen is small, I think it’s laid out very well with neatly-packed-to-the-gills cabinets that extend all the way to the ceiling and numerous drawers.

I did a little of my own retrofitting and turned an old built-in ironing board cabinet in the kitchen into a spice cabinet.

I imagine it was from the days of yore when the women folk were required to live in the kitchen with one hand cooking, the other ironing and one hip supporting a tot.  :/

Time to Party Semi-Heartily!

I am never one to turn down an opportunity to party.  My cousin is getting married and all the pomp and circumstance must be marked along the way.  Being that this was an afternoon shindig for the announcement of said engagement, some semi-heartily partying did happen.  :)

For many years, I ran and planned events for a non-profit organization for millionaire entrepreneurs.  Kinda paradoxical, I know.   The events centered around networking and education to further enrich the rich.  It was fun, challenging, and rewarding.

I parlayed that into wedding planning which is an entirely different beast.  Weddings have the potential to bring out the worst and best in people.  The Husfriend and I witnessed the latter at our own wedding a few months ago.  We were humbled by the graciousness, generosity and kindness of  those who came to wish us well in our future life together.  Happy sniff, sniff.  :)

I hope that my cousin finds this to be true for her own wedding and Sunday marked the first occasion of the wedding party planning journey.  Woo hoo!

She attempted to keep it small to start for the engagement party – a mere 100 guests which happened to be 33 more than the fire marshall allows.  :/  Size matters.  And is relative.  Our wedding had 200 guests, which was small compared to my eldest sister’s 400 and my brother’s 1,000.  Yes, that last number required a comma.

There was lots of food, fun, friends, and family.

The Husfriend, Pepsi, and I were on hand to lend a hand and tiny paw with whatever we could.

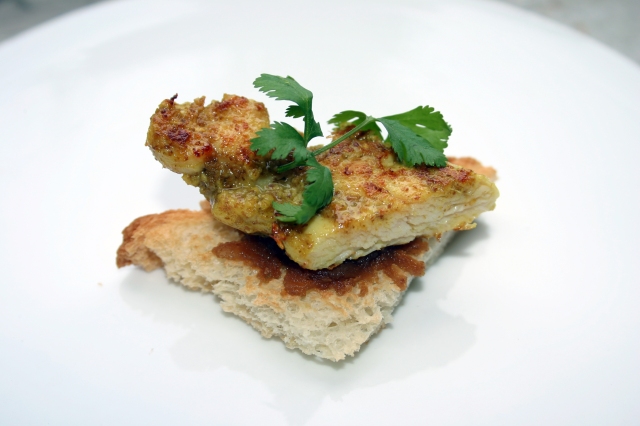
Our contribution to the menu was chicken satay crostini.  I initially tried baking miniature loaves of brioche that, although tasty, didn’t look so purdy so that was scrapped.

My sister sent me a recipe many moons ago that I have successfully repeatedly repeated for the chicken satay:

  • 1 1/2 tablespoons of palm or dark brown sugar
  • 1 tablespoon of whole coriander seeds
  • 1 tablespoon of whole cumin seeds
  • 2 inches of peeled fresh ginger
  • 4 cloves of garlic
  • 1 teaspoon ground turmeric
  • 1 teaspoon kosher salt
  • 2 pounds of boneless, skinless chicken breast
  • cilantro sprigs for ganish
Basting Oil:
  • 1/3 cup of coconut cream
  • 1 tablespoon canola oil
  • 1 tablespoon of palm or dark brown sugar
Satay is most often cooked and served on skewer sticks.  It would have been too labor intensive to do so in this case so we opted for the crostini route which was basic white bread triangles toasted on a baking sheet until golden brown for about 5 minutes at 400°.

However, if you are doing the stick method, most recipes recommend soaking the sticks for 30 minutes beforehand to prevent the sticks from catching fire.  Because chicken breast cooks so quickly, I’ve always skipped this step and have not had to call on Fire Marshall Bill yet.

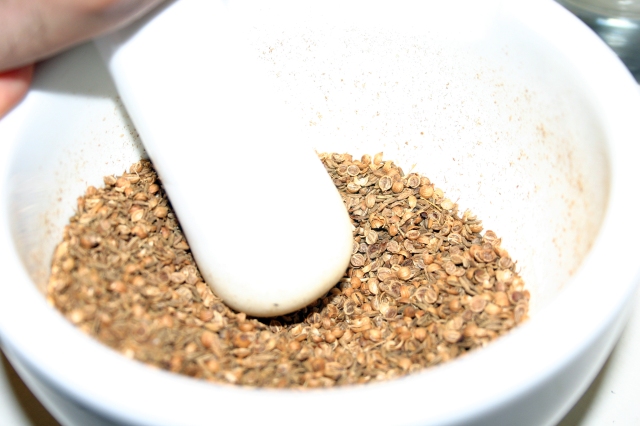
The next step is to toast the coriander and cumin seeds.  This step makes quite the difference in bringing out their flavor and adding a subtle smoky/nutty quality.  I’ve been lazy before and used the pre-ground stuff and it’s not the same.

After they’ve cooled a bit, grind the seeds either in a spices-dedicated coffee grinder or with a mortar and pestle.

Then add everything else, sans chicken and fresh coriander, and brutalize into a paste.

Grilling chicken breast doesn’t necessarily have to mean chicken jerky.  My mother, who is one of the best cooks I know, taught me that if you cut the breast against the grain, on the bias, in long strips, the juiciness can be preserved.

Next, smush the sliced chicken pieces together with the paste, making sure to not leave any pieces unmolested.  Cover and refrigerate for a few hours or preferably, overnight.

Next, combine the basting ingredients.

Satay can be grilled on an actual grill or griddle at medium high heat.  Grill the strips in a single layer for two minutes on each side.  Be sure to baste with a few dabs of the basting oil before and after flip.

Satay is often served with peanut sauce.  I tweaked this recipe and it turned out great:

  • 1 cup of crunchy all-natural peanut butter
  • 2/3 cups of water
  • 2 cloves garlic, minced
  • 1/2 teaspoon of dark soy sauce
  • 2 teaspoons of sesame oil
  • 1 to 2 tablespoons of brown sugar, to taste
  • 2 to 2 1/2 tablespoons of fish sauce
  • 1/2 teaspoon of tamarind paste
  • 1 teaspoon of green curry paste
  • 1/3 cup coconut milk
Smear peanut sauce on toasted crostini, top with satay and garnish with dainty coriander sprig.

Yums.

Burial at Box

I finally had to give up any hope of resuscitating our beloved kaffir lime leaf tree.  She will be missed…

In anticipation of Spring, new life has sprung throughout our home.

My sister picked up two fiddle leaf fig trees for us which I’ve replanted in the old stomping grounds of our kaffir lime leaf and bird’s eye chili trees.  The fig trees were a whopping $10 for both from Sprouts Farmers Market.

Aren’t they purdy?

They are my new obsession and hopefully, one day, they’ll grow up big and strong and take over our apartment like they did in this place in Elle Decor:

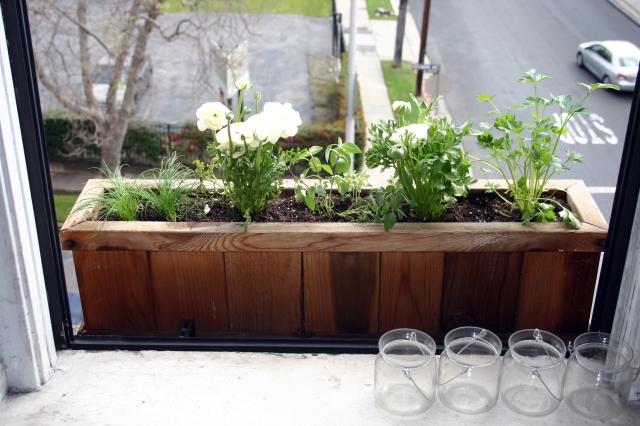
Life has also sprung up in our window boxes in the form of chives, Thai basil and Italian parsley mingling with luscious Persian Buttercups from Lowes.

On the south side, we have rosemary, sweet basil and thyme, from Home Depot, flanked by generic “color plants” from the good ol’  99¢ Only Store.   I wonder what color they’ll actually be…

These window boxes have traveled with me far and wide throughout the last decade.  I have had them since my second apartment  in Downtown San Diego, which happened to be two doors down from my very first <200 sq. ft. apartment.   Yep, <200 sq. ft. comprised of one room with a coat closet and a bathroom.

The best times were had in that tiny apartment.  I managed to squeeze a queen bed, padded storage chest (which doubled as the guest bed), desk and buffet cabinet into the one room.

I even had a roommate.

This guy:

Who incessantly did this:

Kashmir is his name and yelling is his game-o.  :/

The 3.2 cu. ft. mini-fridge and the buffet cabinet, with rice cooker and hot plate on top and dinnerware, silverware and pantry inside, worked in tandem as the “kitchen.”  I hosted dinners and cooked real meals in my Barbie kitchen.  The folding coffee table doubled as the dining table.  Grossly, dishes had to be done in the bathroom sink.

The 17″ monitor worked triple shifts as the computer display, Nintendo Wii Sports display and television display from the computer’s analog tv tuner.  And when that wasn’t enough, the same Simpsons, Season 7 DVD set was projected on the walls.  Every day, the two windows above the bed and storage bench welcomed the unwelcome aroma of Asian Fusion from the restaurant below.  The view from the two windows would have made any mason proud.

My poor mother cried when she saw the apartment for the first time, asking what was so horrible at home that I would pay to live here?  The comforts of home were no match for that first priceless taste of independence.

The second apartment was two doors down in the front of the building and three times the size – a staggering 600 sq. ft.  Moving day was just me and Kashmir walking back and forth down the hallway with our stuff.

We’re moving on up, Mr. Jefferson!

Babes, What’s for Dinner: Oyster Shooters and Wild Atlantic Salmon Pot Pie

As with most everything we make at home, our meals stem from cravings either of us are having at the moment or simply trying to recreate something we’ve had before.  This meal was a little of both.

Recently, a friend and I revisited a sushi restaurant in San Diego that we hadn’t been to in a few years.  It’s a more than 2-hour drive from Los Angeles and a half-hour drive from where I used to live in San Diego so it’s certainly not convenient.

But the one thing that makes the drive worthwhile is their oyster shooters, especially during Happy Hour when they’re only $1.50 a pop.  I’ve been known to put a few dozen away.  :)

Being that it was 2 hours away and nowhere near Happy Hour at three in the morning, I decided to recreate my own.  After some googling for a ponzu recipe and a quick trip to the 24-hour Ralph’s, we had the most amazing, and possibly even better than the original, oyster shooters.

The ponzu recipe, which I tweaked a little, is simple and tasty:

  • 3 tablespoons of mirin
  • 2 tablespoons of rice vinegar
  • 1 tablespoon of tamari soy sauce
  • 1 rounded teaspoon of dashi
  • ¼ cup of fresh lime juice
I threw everything into a half-pint mason jar and shook until the dashi was dissolved.  This will definitely become a staple condiment in the refrigerator door.
All we had to do next was assemble the shooters:
  • oyster (ours were huge so we cut them into thirds)
  • a pinch of thinly sliced scallions
  • a pinch of sesame seeds
  • a tiny squeeze of Sriracha
  • a tiny dollop of masago
  • a tablespoon or two of the homemade ponzu
  • garnish with pickled burdock
With the $5 jar of oysters at Ralph’s, we were able to make a dozen shooters. Not too shabby…

Whilst googling, I also snagged a seasoned vinegar recipe for seasoned sushi rice for the main course, Wild Atlantic Salmon Pot Pie.

  • 2 tablespoons of rice vinegar
  • 1 tablespoon of sugar
  • ¼ teaspoon of kosher salt

This pot pie is also a take on a dish that I’ve had before in a now-long closed sushi restaurant in San Diego. They made theirs with yellowtail but I’m sure any firm fish would work.

Basically, I cook all grains – be it rice of any kind, quinoa, steel cut oats, etc. – all the same with my tried-and-true 2:3 ratio. Rinse grains feverishly until water runs clear then drain and let dry completely. Bring 2 parts grain and 3 parts liquid to boil, reduce heat, cover and let simmer until all liquid is absorbed.

I cooked one cup of calrose rice, which yielded about two cups of cooked rice and fluffed it with the seasoned vinegar.

As for the topping, the following ingredients are combined according to preference.
  • 8 ounces of wild Atlantic salmon (we get ours from Costco where they’re pre-portioned in handy vacuum packs)
  • a big dollop, or two, or three, of masago
  • 4 tablespoons of Japanese kewpie mayonnaise
  • a big dollop of chili garlic sauce

You really can’t go wrong with putting too much or too little of anything.

Next, fill the pie tin with the seasoned rice, top with fish mixture and pop in broiler until golden crusty goodness appears (about 10ish minutes – check often).

Top with thinly sliced scallions, serve with lemon wedges and tamari soy sauce and savor…

Dorothy’s Homecoming

Given that we pretty much cook every day, sometimes, several times a day, the dishes pile up very quickly in our small kitchen.  So, we figured it was time to pony up and get some help.

It didn’t take long for us to find Dorothy the Dishwasher hanging out on good ol’ Craigslist.  She was perfect.  She did everything the big girls do, just in a slightly smaller package.  She was portable and could double as counter space or be whisked away entirely when company came over.  She lived with a small family not too far from us, who were in the process of moving, so we quickly headed over.

The family was very nice and threw in a half bottle of detergent to seal the deal.  :)  The woman remarked that having a dishwasher would “save our relationship.”  Hehe.

The only problem we had in our relationship up to that point was that was we hadn’t thought far enough ahead as to how to get her home.  Although compact, she was quite heavy and would not have fit in the backseat or trunk of the car.  It also wouldn’t have worked to rent a truck because we’d still have to somehow get her onto the truck bed.

The only thing we had was our trusty dolly.  And, we were only about 2 miles from home.  So, off we went…

It wasn’t the best solution because the load was a lot heavier than the intended weight for the dolly, but hey, we had to make do.  So, there we were, two renters and their precariously packaged dishwasher strolling through the streets of LA.  We got many a strange look from the passersby.  We even encountered a man whom Husfriend surmised was an aspiring comedian who remarked “Most people walk their dogs!”  Chuckle, chuckle.

We eventually made it home, dropped Dorothy off and hopped on our bikes to retrieve our car and all was good again.

Danglers

I have been here in the good ol’ Midwest for almost a month now where there has been plenty of time to miss home and ponder the things I’d like to finish when I get back.

The Bathroom:  Our bathroom is so old that it was literally falling apart.  The ceiling sagged, there were huge cracks in the wall and the drywall in the shower crumbled.

I peeled off the thick, old layers of navy blue, sparkly gold, tan and various whites off the walls and filled in the holes and cracks as best I could, using about a gallon of spackle.  Everything was then sanded and Kilzed.  I painted the ceiling generic contractor white.  The rest of the walls were painted with “custom” gray that I mixed from a pint I found in the Home Depot bargain bin and a gallon of white.  After taping off the ceiling border, I painted the top half of the bathroom grey.  The bottom half is white subway tile.  It came out really nicely except that when I went to remove the tape, it took off some of the ceiling paint.  Crappy.  There’s also a little bit of gray paint splatter I have to clean up off the tile.  And it’s been that way since then…

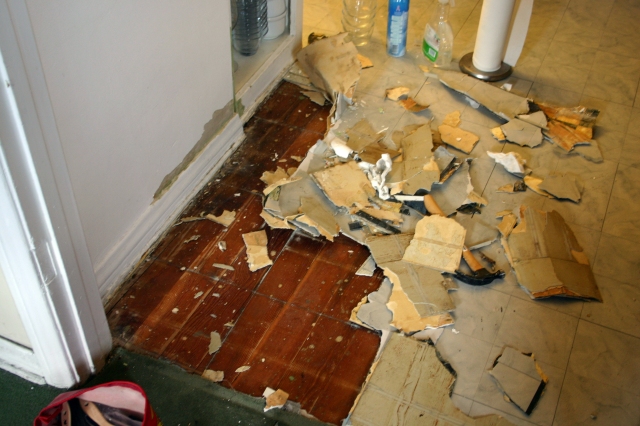
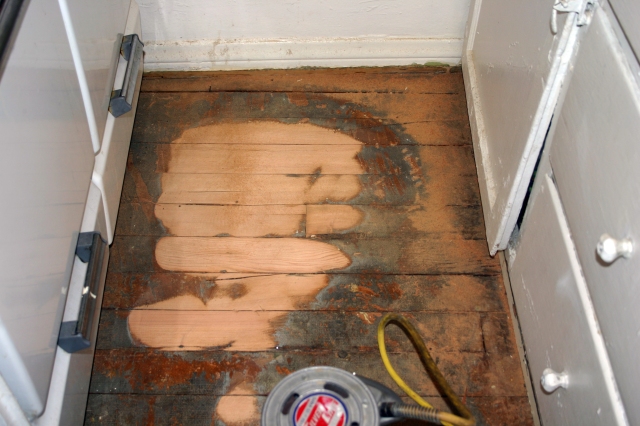
The Kitchen Floor:  While Husfriend was away last year on what we’re now calling his walkabout spending the winter alone in the snowy Midwest, I had the brilliant idea to spruce up the kitchen floor on the same day I was supposed to pick him up from the airport.  It started innocently enough with tearing up a small corner of  linoleum tile that had started to come up.  Curiosity got the best of me and next thing I knew, I was moving appliances and was buried in easily several hundred pounds of nearly 100-year-old flooring.  There was gray linoleum, commercial flooring, black and white checkered tiles, and lots of crud holding it all together atop some pretty nice hardwoods that was covered in hardened glue.

This is how it all began:
Then it got a little worse:

I hauled about 10 of these boxes downstairs to the dumpster:

It remained that way for several weeks while I recovered from all the lonesome heavy lifting.  I guess when you’re running off of DIY adrenaline, you don’t realize the toll that schlepping 3-4 hundred pounds of flooring will do to your body.  

I finally gave in and rented a commercial sander.  “Gave in” simply because I figured I could purchase a hand sander and do the whole thing myself.  Given my dangling DIY track record, Husfriend wouldn’t allow it.  The commercial sander was no walk in the park either.  Imagine squatting with a 40-lb electrical baby between your legs that you have to keep from cutting you and from touching the floor too much so as to not grind a big hole into it.  Fun times.  Being the Frugal Fran that I am, I figured I could get it done in one Friday afternoon and not have to pay for additional rental days.  Six hours later, I had to call it a day.  I finished the next day but ended up having to keep it until Monday when the shop opened up again.  Damn.

And that’s the way it’s remained since.  Raw hardwood…

The Laundry Room:  We scored an amazing deal from one of my favorite stores – Craigslist.  :)  We got a full-size LG washer and dryer in one for 75% off retail delivered right to our door.  Gotta love that Craig.  Now, Walter the Washer needs a home.  So far, he’s been crashing in the kitchen.  Husfriend doesn’t mind, but I do.  Walter’s nice but too big for such a small space.  Most one-bedroom apartments don’t come with their own laundry room so Walter’s moving into the front hallway walk-in closet.  He’s ventless and can’t see so the closet shouldn’t be a problem.  However, we’ve got two slight issues – Walter’s just a little too fat for the entrance and there’s no water source.  When I get home, I’m going to have to jam the jamb so he fits and convert Walter into a portable unit so that he can connect to the kitchen faucet the way Dorothy the Dishwasher* does when she’s at work.  Dorothy lives in that same closet now.  I don’t think she’ll mind a new roommate.

In case you’re wondering how we’re able to do all this as renters, let’s just say we have a very lackadaisical landlord.  The funny thing is, the only thing in the lease that is to remain once we leave are the crusty blinds (which I have since already replaced).  We also plan to stay in this apartment for a very long time.  It’s on a beautiful tree-lined street in the middle of Los Angeles.  Who knew those existed?  :)

*There’s a cute story about bringing Dorothy home that I’ll share later.